Showing posts with label craft fair. Show all posts

Thursday, October 3, 2013

All about my first craft fair

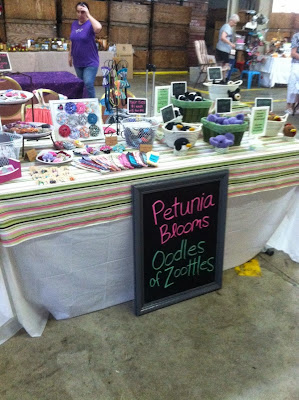
On September 28th, my sister and I had a craft fair. It was her second and my first. Boy, were we both nervous! I spent the few days before at Jaquelyn's house so that we could get ready together; plus it would make it easier for us just to go together. 

We went shopping, wrote chalkboards, cut fabric... etc. We also worked on exactly how to merge our two shops onto one table and still look organized and lovely. 


We made lists and we packed and packed! We did our best impersonation of Santa Claus and checked everything twice, (maybe three times ;) ). By Friday night we felt pretty ready, still nervous, but ready. =) And I was so happy because I reached my goal of 50 Zoottles!!
The fair was at Mixon fruit farm in Bradenton, so it was only about 20 minutes away. We got there in plenty of time to set up, order lunch, and chill for a while talking to other vendors.


So, what did I learn from my first craft fair?
  • A great table cloth {i.e. fabric} is key. Especially when you're mixing two shops with different color schemes.
  • Chalkboards are amazing! Did you see those little ones clipped to our baskets? I simply painted some wood squares from Michaels with chalkboard paint and hot-glued them to clothespins. Now we could write prices and labels any way we wanted! We also used a chalkboard made from a mirror {tutorial here!} to write both our names. My colored chalk markers also came in great use!
  • Location matters! We thought we had a pretty good spot. Turns out, we were right in peoples blind spot! People would walk all around without even looking at us. Solution? Well... Get a better spot =P Or maybe play music {not something annoying} to catch peoples attention.
  • Be confident! I have to admit, even though I love our products, sometimes it is hard to step out in confidence and really sell it. I mean, putting it out there for peoples criticism is hard! {I had one lady say my little baby toys were dog toys...} But really, without being annoying, you have to be able to share with others why they would want to buy your stuff. That is something I am going to work on next time. Sharing my vision, my products, my love for what I do.
  • Age. Sadly, the age group of people showing up was not ideal for our products. Something to think about when we sign up for the next one. Who is the event catered to?
  • Lastly? This whole handmade business thing is HARD! And lots of WORK! It is not a cake-walk. But it is so worth it!
Our next craft fair is in November and I have big hopes for it! Do you have any advice?


Until next time...


Tuesday, September 24, 2013

Mirror Chalkboard

Okay, chalkboards are super popular! And I think I'm a little late jumping on the bandwagon... Oh well, I'm on now! That said, I am so excited about this DIY. 


My inspiration really came from two places. First, our (Jaquelyn and I) craft fair that is this Saturday (eeek!). We are sharing one booth, but we are two different shops. I was brainstorming for so long trying to think of a creative, cute way to display both our names. Then, I kept seeing pictures everywhere of people turning mirrors into chalkboards and saying it worked great, (my sister Jennifer just so happened to be getting rid of one). Ummm... Can I say, perfect?? Time to get to work. These are so simple! If you are a thrifter/garage saler, I'm sure you'll be able to find a cheap old mirror. This DIY just gives it a new life! 

What you'll need:
~ A mirror. As I said, this is an old one that we've had for a long time and it was time for a makeover!
 ~ Spray paint: You can get crazy with this if you want; but I needed mine to be a good neutral color since Jaquelyn and I have different colors for our shop themes. (I got mine for about $4 at Walmart)
~ Painters tape: Easy peasy, found pretty much anywhere. =) (I got mine at Walmart, can't remember how much.. A few dollars.)
~ Chalkboard paint: Any kind will do. I have never tried the spray paint, so I can't recommend it, but feel free if you're feeling brave! (Michael's for $6)
~ Foam brush: These are great because they put on a smooth coat and won't leave hairs. (Michael's for $0.99)
~ And Newspaper: (Found at my local newspaper box.)


1. First step is to make that mirror frame new. Best place for spray paint is outside. Lay out some newspaper, (unless you want a pretty driveway/lawn ;) ), to put your mirror on. Then you need to use more newspaper to tape off the mirror part. Not too hard. I put the paper almost to the edge and then used the painters tape to cover the rest and keep the paper down.


2. Pull out that spray paint and simply follow the directions on the back. I ended up needing to do about 3 coats to cover all of the gold.


Let the paint dry and then pull off the paper. Almost done!

Photo bombed by my cute puppy Nora ;)
3. Break out the chalkboard paint. =) Again, you can find good instructions on the back of the bottle. I used three coats to make sure I had a good thick chalkboard. =) You have to let the coats dry at least an hour in-between and then cure for 24 hours after you're done.

1st coat

Second coat

And third coat =)
{Here's a closeup of the board and frame}

4. After letting it cure, all you have to do is use some chalk and rub a light coating all over the chalkboard and it is ready to be used! 


This is a trick I am definitely going to use again; especially once I'm married and have my own house. ;) I'd love to know if you try it yourself!
Until next time...